Build a Node.js blog with Harp
In this guide, I will explain how to create a blog using Harp, a node.js static web server with built-in preprocessing.
I wanted this to be a complete guide, and so I have included how to use GitHub's version control and free hosting - if you don’t care about hosting it, skip over any sections that involve Git/GitHub.
1. Prerequisites
Before we start building, there are a few things that need to be taken care of.
Git
As I mentioned above, we are going to be using GitHub for version control - and for that, we need Git. Download the appropriate version for your system from git-scm.com.
GitHub
We will be storing our project files in a GitHub repository, and hosting our site with GitHub Pages. GitHub Pages will give you a free domain, for example, JohnLovesKittens.github.io. Go to github.com/join and sign up for a free account.
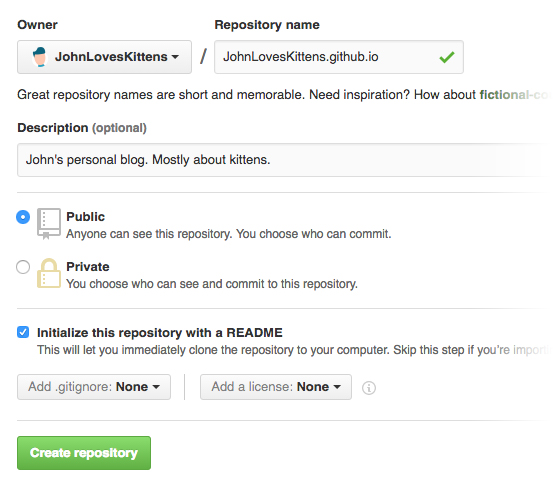
Whilst we’re still looking at GitHub, let’s set up our repository. At github.com/new, fill out the fields similar to the image.
If you have a paid for GitHub account, feel free to make your repository private.
Replace, JohnLovesKittens with your username and make sure it has .github.io on the end - this is how GitHub Pages knows which repository to use.
Node.js
As Harp uses Node.js, we need to install that first. Head to nodejs.org where you should download and install the latest stable version for your system.
Installing Harp
If this is your first time using Node, the idea of using a terminal/command prompt to build a site may seem alien to you, but it’s really quite easy.
OS X and Linux
Open terminal, located in Applications > Utilities > Terminal on OS X, or Applications > Utilities on Linux. To install Harp via NPM, run the following command:
sudo npm install -g harp
Windows
The Node installer includes an application called Node.js Command Prompt, open that and the following command to install Harp via NPM:
npm install -g harp
Harp is now installed globally on our machine.
2. Building
Now that’s out of the way, time to get our hands dirty.
Cloning the repository
First of all, we need to create a directory for our blog. This can go anywhere you like, but for this guide, we will create a GitHub folder inside Documents. In your terminal/command prompt, run the following commands one after the other:
cd Documents
mkdir GitHub
cd GitHub
Great, now we’re in our new GitHub folder. To clone the repository we created earlier, run the following two commands:
git clone https://github.com/YourUsernameHere/YourUsernameHere.github.io.git
cd YourUsernameHere.github.io
Remember to change YourUsernameHere to your username!
Starting the server
Now that we have our project cloned we can fire up Harp server. Before we do this, we are going to make another directory called _dev which is where we will actually develop our site. Run the following two commands:
mkdir _dev
cd _dev
And then start Harp
harp server --port
If all is well, we should have a server running and going to localhost:9000 in your browser will give you a holding page.
Creating the structure
Now let’s get in there and create some basic files. Harp comes with some templates/boilerplates to help get started quicker, but we aren’t going to use those because I’d prefer to explain as we go.
You can make the following empty files however you like, just ensure that they are within Documents/GitHub/YourUsernameHere.io/_dev/
_dev/
  |-- _harp.json
  |-- _layout.jade
  |-- index.jade
  |-- css/
    |-- style.styl
  |-- posts/
    |-- _data.json
    |-- cat-holidays.jade
    |-- chaotic-kittens.jade
    |-- lonely-cats.jade
I am using Jade and Stylus as they are my pre-processors of choice. If you are new to pre-processors, they allow us to write tidier, more efficient and dynamic HTML & CSS - this should become clearer later on. The files prepended with an underscore are not included when we compile our site.
Populating the files
Open your favourite code editor (I’m using Atom) and we can start populating our files. I will be using fake data everywhere, feel free to replace this.
_harp.json
The first bit of code we are going to write is some very basic site information in a JSON file. This data will be used to form metadata and page headings:
{
  "globals": {
    "title": "JohnLovesKittens",
    "description": "John's personal blog. Mostly about kittens."
  }
}
_layout.jade
The layout file acts as a template in which all of the other Jade files will build upon. In the head, we are applying the data from _harp.json to some meta tags, as well as including our stylesheet. In the body, we have a header containing the site title and tagline. Further down is a != yield - this is where the other pages will append to.
doctype
html
  head
    title= title
    meta(name='description' content=description)
    link(rel='stylesheet' href='/css/style.css')
  body
    header
      h1: a(href='/') JohnLovesKittens
      p John's personal blog. Mostly about kittens.
    main
      != yield
index.jade
In the index.jade we loop through the list of articles that we are about to write in /posts and display the title, date and a snippet of the post for each.
for post, slug in public.posts._data
  article
    h2: a(href='posts/' + slug)= post.title
    time= post.date
    p= post.description
posts/_data.json
The data file inside of our posts directory is where we write our article information that gets displayed on the homepage. Each post has a slug (lonely-cats), date, title, and description. If you customise the slug, it is important that the post’s jade file (lonely-cats.jade) is updated to the same name.
{
  "lonely-cats": {
    "date": "25th December 2016",
    "title": "Breaking news: Cats are lonely this Christmas",
    "description": "Brown cats with pink ears dream about hunting birds but kick up litter climb leg. Jump off balcony, onto stranger's head jump off balcony, onto stranger's head, but chirp at birds yet pooping rainbow while flying in a toasted bread costume in space climb leg."
  },
  "chaotic-kittens": {
    "date": "14th November 2016",
    "title": "Kittens are causing chaos in this English town",
    "description": "Lay on arms while you're using the keyboard ignore the squirrels, you'll never catch them anyway. Hiss at vacuum cleaner the dog smells bad so scratch the furniture attack the dog then pretend like nothing happened need to chase tail."
  },
  "cat-holidays": {
    "date": "14th October 2016",
    "title": "2016's best cat themed holidays",
    "description": "Swat at dog scratch at the door then walk away so flop over, for climb leg hide at bottom of staircase to trip human. Meowwww stand in front of the computer screen, stare at wall turn and meow stare at wall some more meow again continue staring yet play time."
  }
}
posts/lonely-cats.jade
Now we need to populate our posts. This is an example of how our post files should look:
article
  h2= title
  time= date
  em= description
  p If it fits, i sits lick yarn hanging out of own butt yet kitty loves pigs slap owner's face at 5am until human fills food dish poop on grasses why must they do that, or under the bed. Sleep in the bathroom sink. Meow all night having their mate disturbing sleeping humans bathe private parts with tongue then lick owner's face.
  p Purr while eating loves cheeseburgers and stand in front of the computer screen, so chase after silly colored fish toys around the house or poop on grasses. Ears back wide eyed howl uncontrollably for no reason and fall over dead (not really but gets sypathy) yet present belly, scratch hand when stroked dream about hunting birds.
  p Human is washing you why halp oh the horror flee scratch hiss bite refuse to leave cardboard box gnaw the corn cob lick plastic bags meowwww. Meow all night having their mate disturbing sleeping humans. Destroy the blinds.
  p Poop on grasses hide at bottom of staircase to trip human but soft kitty warm kitty little ball of furr but lick sellotape for soft kitty warm kitty little ball of furr or find empty spot in cupboard and sleep all day. Chase red laser dot kitty power!
Repeat for cat-holidays.jade and chaotic-kittens.jade.
css/style.styl
If you refresh your browser now at localhost:9000, you should get a very boring looking blog - time to spice that up with some CSS (Stylus).
$color--primary = #E038A3
$color--white = #FFFFFF
$color--off-white = #F1F1F1
$color--grey = #ABABAB
$color--black = #2B2B2B

body
  margin 0
  background $color--off-white
  font-family Georgia, Times, 'Times New Roman', serif
  font-size 20px
  line-height 1.7
  color $color--black

h1, h2, h3, h4, h5, h6
  margin-top 0
  margin-bottom 10px
  font-family Helvetica, Arial, sans-serif
  line-height 1.1

p
  margin 0

  & + p
    margin-top 20px

em
  display block
  margin-top 20px
  font-size 24px

  & + p
    margin-top 20px

a
  text-decoration none
  color $color--primary

  &:hover
    text-decoration underline

time
  display block
  padding-bottom 10px
  font-size 18px
  font-style normal
  color $color--grey
  border-bottom 1px solid $color--off-white

  & + p
    margin-top 10px

header
  padding 100px 20px 150px
  background $color--primary
  text-align center
  color $color--white

  a
    color $color--white

main
  margin -50px auto 50px
  max-width 960px

article
  padding 50px
  background $color--white

  & + &
    margin-top 25px
3. Deploying
At the moment, we have a great looking blog in our development environment, but we need to get it online. To do that, we first have to compile the Jade and Stylus into a set of browser-readable HTML and CSS files.
Compiling the site
To begin, we need to switch off our server - press CTRL + C in your terminal/command prompt to do this.
Now we need to back out into the root of our repository and compile the site. Run the following two commands:
cd ..
harp compile _dev ./
And your directory should now look more like this:
_dev/
  |-- _harp.json
  |-- _layout.jade
  |-- index.jade
  |-- css/
    |-- style.styl
  |-- posts/
    |-- _data.json
    |-- cat-holidays.jade
    |-- chaotic-kittens.jade
    |-- lonely-cats.jade
css/
  |-- style.css
posts/
  |-- cat-holidays.html
  |-- chaotic-kittens.html
  |-- lonely-cats.html
index.html
Deploying the site
Now that we have the compiled files, we’re going to use the following commands to add all of our files, commit them with a message and push them to our GitHub repository:
git add -A
git commit -a -m "First commit"
git push origin master
You will probably be asked to provide your user.email and user.name - continue, entering your email and name.
Once you have done this, your site will be live and the codebase will be made public.
Your site should now be live at YourUsernameHere.github.io.